| High Jump Approach Mapping - A New Way to Develop A Consistent High Jump Approach |
| By: Dusty Jonas
Originally Published in: Techniques Magazine Provided by: USTFCCCA Development of an approach that is specific to each individual is of the utmost importance in order for a jumper to clear the highest bars efficiently while avoiding unnecessary injury in the process. A non-debatable fact about using a curved approach is its purpose: To create inward lean and centripetal force. The resulting forces after takeoff create a twisting backwards somersault that allows the athlete to twist their back to the bar while simultaneously rotating the body over it (Dapena & Ficklin, 2007). By doing this efficiently it is possible for a jumpers center of mass (COM) to potentially pass below the bar meaning that the athlete does not have to jump as high to successfully clear the bar. These principles will be used to answer the question of where to begin developing a high jump approach. For the purposes of this article a 10 stride "J" style run up will be used. This includes a five-stride acceleration on a straight line and a five stride portion on a curve. My goal for this article is for you to be able to map out a full approach and quantify several useful pieces that are often neglected: The attack angle at of the end of the approach and the arc length. PREVIOUSLY USED METHODS The two most widely used approach development methods are: the "J" run back, and straight line approaches that are transferred onto a curve. There are inconsistencies with each of these methods that may lead to technical issues later in the athlete's development. The "J" run back is performed by an athlete starting at a takeoff point an arm's length away from the bar and running back in the shape of the letter J. This approach is difficult to replicate with any consistency and using this technique requires the athlete to accelerate on a curve rather than a straight line. The straight line approach is performed by the athlete running five steps in a straight line at the speed that they feel that they could successfully execute a jump. After 3-5 trials, the average of the measurement is taken. The athlete is then asked to run the full ten steps on the same line, marking the average distance of the tenth or takeoff step in the same manner as before. The two measurements are taken to the apron where the athlete and coach estimate a distance from the standard and a radius length to fit. Using this method can result in hours of guesswork regarding the curved portion of the approach. Any radius that is decided upon by the coach will be purely conjecture and will more than likely not be executed correctly for quite some time, if ever. APPROACH MECHANICS The process begins with discussing what makes the flop so effective: the curve. The two main reasons to run a curve in the high jump are to lower the athlete's COM and to facilitate rotation around the bar in flight (Kerin, 2015). The curve an athlete runs in a high jump approach is determined by several different factors such as age, body morphology, strength levels, speed, and experience. The most important thing to remember is that regardless of the curve an athlete runs, it should be run correctly with good curve running mechanics. Using this method of approach development means that it is very important to explain what the term "good curve running mechanics" means. The goal of the first five strides of the approach is to develop as much horizontal velocity as can be maintained through the next five strides on the curve into takeoff. The mechanics of the first five strides are consistent with a normal acceleration pattern and upright sprint mechanics. If the athletes have not developed sufficient horizontal velocity prior to entering the curve they may try to accelerate while running the curve. The mechanics and postures involved in acceleration are much different than those desired while running the curved portion of the approach and these may contribute to the athlete deviating from the curve (Becker, Kerin & Chou, 2013). The goal of the second half of the approach is to run a curve with the greatest amount of controllable horizontal velocity with as much inward lean as possible and still be able to safely execute the jump (Dapena, McDonald & Cappaert, 1990). When an athlete begins to run a curve, the forces being exerted through the ground are no longer just vertical, they are also lateral. This means that the smaller the radius is, the more difficult it is to stay on the curve in a normal stride pattern with speed without deviating from it (Chang & Kram, 2007).
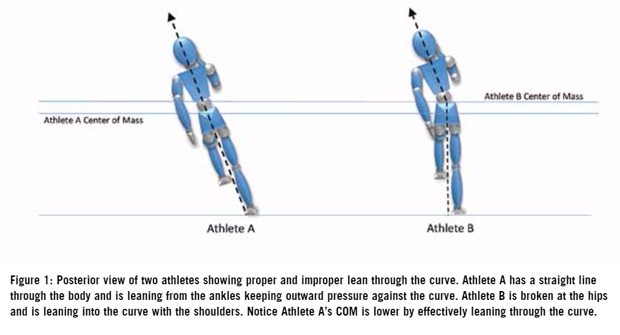
It is highly possible that a deviation from the curve is one of the biggest contributing factors to an athlete missing the bar. Deviations from the curve result in the loss of inward lean which will inhibit the facilitation of rotation around the bar. Research also shows that the loss of inward lean contributes to longer times spent on top of the bar by way of distance traveled down the bar during flight (Becker, Kerin & Chou, 2013). See Figure 1 for proper and improper curve running mechanics. Teaching an athlete how to run a technically correct curve is the best way to start developing a high jump approach. Running A Technically Correct Curve Results In... • High vertical velocity off of the ground relative to the athlete • Back rotating to the bar • Fast somersaulting over the bar • Short time spent over the bar THE CIRCLE DRILL The best way to teach an athlete a skill is by doing drills that are specific to the event. This method of approach development starts with a drill that is modified from the long-utilized circle drill. It is performed by having the athlete run, skip, or jump around various sized circles. Things to Remember When Selecting A Radius Size • Radius size is dependent on the great-est amount of controllable inward lean and horizontal velocity • High velocity + high strength level = LARGER radius • Low velocity + low strength level = SMALLER radius • Experiment with different sizes, drills, and speeds Table 1 shows the variety of radius distances by elite men and women measured over time (Dapena, 1995). The collegiate men that I coach do well on a 35'-42' radius and women on 30'-36'. These are just suggestions and may be adjusted as the athlete progresses.
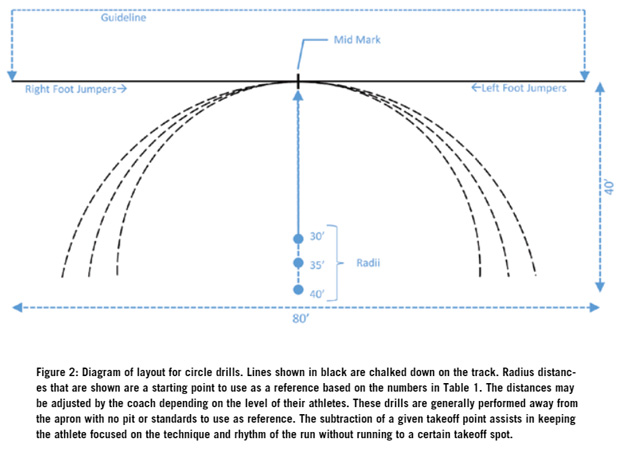
Begin the setup of the drill by drawing three different half circles on the track with different radius measurements that are all connected at the same mid mark. Radius measurements of 30', 35', and 40' are most often selected as these distances cover the entire range for men and women. Smaller or larger radius measurements may be chosen to suit the needs of varying skill level athletes. There is some degree of trial and error that the athlete and coach will experience until a radius is found that fits well and that can be executed correctly. Experiment with different radius sizes until one is found that fits the athlete best. The layout for the circle drill is shown in Figure 2. Once the different radii have been drawn on the track the athlete is asked to do a variety of drills on the different sized half circles. After mastering curve running technique on the chosen radius, the straight line portion of the approach is added. The straight line portion of the approach is added by having the athlete start on the mid mark and run back five strides in the same acceleration pattern that they would use on a normal high jump approach. Using Figure 2 as reference, a left footed jumper would run to the right side on the guideline and a right footed jumper would do the opposite. Have the athlete run as many repetitions as needed to get a consistent starting point for the beginning of the approach. Once a consistent mark is achieved, have the athlete run from the new starting point to the mid mark and check to make sure that it is still consistent. Once the athlete is consistently hitting the mid mark, they are to continue running around whichever radius has been selected. Having three different sized radii going through the same mid mark allows a large group of athletes to work on the same set up. Limit the number of radii to three, as any more can be difficult to differentiate visually for the athlete. Using different colored chalk for each radius makes them much easier to see. What this drill effectively does is take an entire high jump approach away from the apron and allows the athlete and coach to experiment with different radius measurements to see which radius the athlete runs optimally. This drill is continued for a period of a few weeks or until the athlete and coach have experimented with various radius distances and speeds.
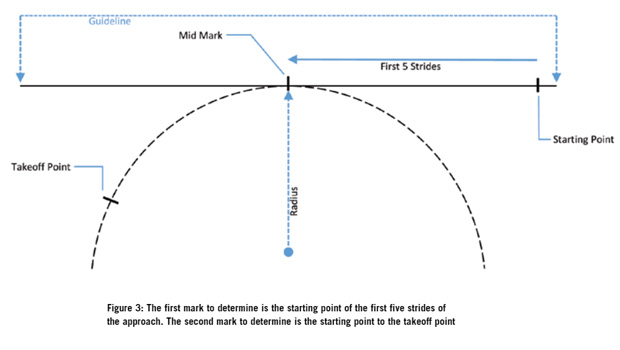
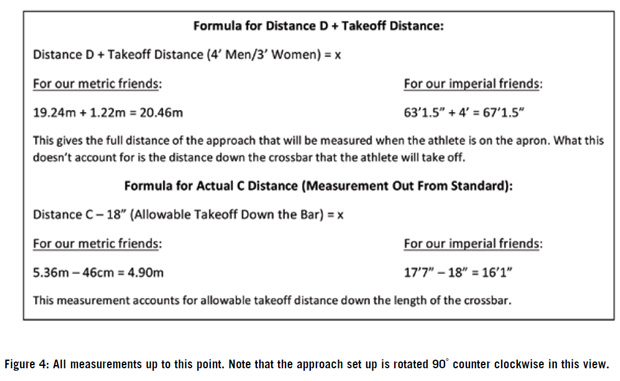
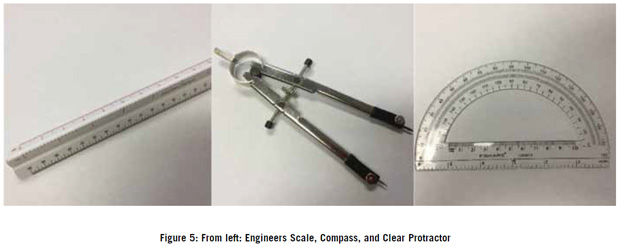
Once the athlete and coach are comfortable with the chosen radius it is time to begin developing an approach using the same drill. APPROACH DEVELOPMENT Once a radius is decided upon, draw the drill on the ground with the chosen radius in the same manner that is shown in Figure 2. When the drill is chalked down on the track and measured, be sure that there is a guideline to help ensure that it is set up as squarely as possible. This will help with the collection of accurate data later. The first mark that will be determined is the starting point of the approach. This process is the same as previously discussed in the circle drill. The athlete should be able to run 3-5 repetitions within 2-3 inches of each other before advancing. Once a consistent starting point has been established the athlete is asked to run the full ten stride approach around the selected radius. It is important that the athlete is consistent on the previously established marks. After the athlete has run 5-6 full approaches within approximately six inches of each other the most consistent mark will be used to establish the takeoff point. See Figure 3 for illustration of the different marks. Measurements will need to be taken when both points are established and marked. It is recommended that both metric and imperial measurements be taken to allow for easier calculations later. Using a spreadsheet to help organize your data is very helpful. An example is provided below in Table 2 with completed data. The data being used in Table 2 is from a male jumper that will be referred to as Athlete 1. See Figure 4 for measurements taken from Athlete 1. Three of the cells in Table 2 have intentionally been left blank since there is not enough data thus far to complete it. The current measurements show the distance of the actual approach but does not take into account the takeoff distance from the bar nor the distance down the bar that the athlete will take off. A general rule for takeoff distance away from the bar is an arm's length. Experience has shown that 3 feet for women and 4 feet for men works well but the coach and athlete may experiment with what is comfortable. I prefer one foot up to 18 inches down the bar at takeoff and for the purpose of this article 18 inches will be used. These measurements will make it possible to calculate "Distance D + Takeoff Distance" and "Actual C Distance". This will begin to answer the question "How far out from the standard should I be?" The answer: It depends on the size of the radius and the speed at which it is run. See below for instructions on how to calculate these distances with data from Figure 4. To map the approach some inexpensive tools will be needed: A compass, protractor, an engineer's scale, and graph paper. At this point, all of the data that is needed to draw the full approach map has been gathered. Using graph paper to draw the full approach map is especially helpful for keeping the measurements square. Once the map is drawn on paper it gives the coach a visual reference to check the direction of the run up and calculate the arc length. Using an engineer's scale is very simple since every inch is broken up into powers of ten up to sixtieths. The tenths scale is the only scale to be used in this process. Using the tenths scale, 1" = 10'. For example, if the radius is 38 feet, it would be scaled down to 3.8 inches.
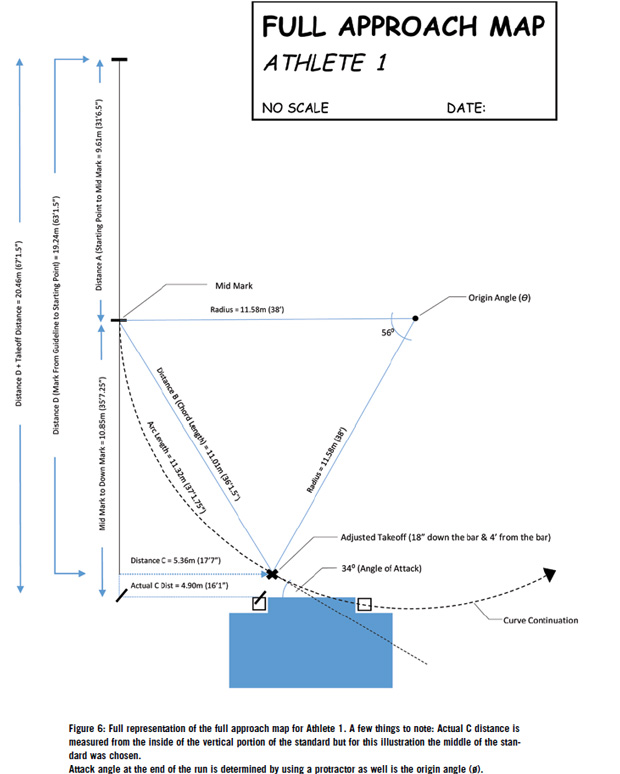
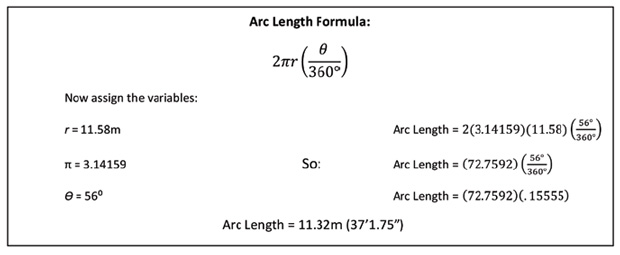
Since measurements were taken in metric and imperial, the data can be scaled down using the imperial system while still having numbers in metric to do easy math with. It is very helpful to draw the pit and standards to provide a reference to start drawing from. Here is how to do it step by step in the order that I prefer. You may draw or measure the approach any way that suits your style. The measurements used will be from Figure 6. 1. Begin by drawing the Actual C Distance or 16'1". This will be a measurement of 1.61 inches using the engineers scale. Start measuring at the middle of the standard as illustrated in Figure 6. Since the scale only works in tenths you may use 1.6 inches. 2. Draw the line that indicates Distance D + Takeoff Distance or 67'1.5". This will be a measurement of 6.7 inches on the engineers scale. 3. Mark the mid mark by starting at the starting point and measure 31'6.5 or 3.1" towards the standard on your paper. This is Distance A. 4. Now mark the takeoff point. Using this example 18" down the bar is allowed while taking off 4' away from the bar. These scaled measurements would be .15 inches down the bar and .4 inches away from the bar. 5. Draw a line for Distance B, or chord length, from the mid mark to the takeoff point. In this case, it is 36'1.5" or 3.6 inches. This is also the time where previous measurements can be checked. If the chord length does not equal 3.6 inches on your scale an error may have occurred while drawing previous measurements. 6. The center of the circle, or origin, must be found. The radius is the distance from the center of the circle to any point on it. The point to be drawn on paper will be the point where the radius length is equal from the origin to the mid mark and the origin to the takeoff point. Notice in Figure 6 that these two lines are of equal length. 7. Draw the radius with the compass. The needle point of the compass will be placed at the origin point and the pencil will be placed on the mid mark. If you have measured correctly it will pass through the takeoff point that was drawn in step 4. 8. Measure the origin angle. This is done by using the clear protractor. 9. Measure the angle at the end of the run. This is done by placing the vertex of the clear protractor on the takeoff point with the radius line to the origin point oriented at 90° perpendicular to the takeoff. Next place a mark even with the baseline of the protractor. You may then draw a line from the takeoff point to the mark you just made. You will now have a tangent line from the radius. To get the angle of attack, simply measure this line in relation to the front of the high jump pit. See the full approach map for a representation of this line. See Figure 6 for the full approach map of Athlete 1. Once the approach map is drawn I would recommend taking the time to analyze it. If the angle of the run up is too shallow or steep the radius may have to be adjusted. For the level of jumper that I have coached, I find that angles of 30°-35° (33 ± 3°) have been the most effective for women and angles of 35°-40° (36° ± 5°) have been most effective for the men. These angles at the end of the run fit my philosophy of the high jump and should only be taken as suggestions. I encourage everyone to experiment with different radius measurements and angles to see which fit the individual athletes best. Once satisfied with the measurements the arc length can now be calculated using a simple equation using data from Athlete 1. The arc length will not be discussed in detail because to do so would result in going into a great amount of detail regarding the technical model. I do believe that it has some significance since it shows the actual distance run by an athlete around the curve. This measurement can lend itself to timing possibilities if one has access to capable timing equipment.
Once the coach is satisfied with the result of the full approach map, make note of the measurements that the athlete will used when transferring the approach to the apron for practice or competition. There are three measurements that are taken and I prefer to measure them in this order: 1) Distance out from the standard 2) The full approach distance and 3) The mid mark. Using the full approach map, Athlete 1 would have these measurements: 1) 16'1" out from the standard 2) 67'1.5" back to the starting point and 3) 35'7.25" to the mid mark. The distance from the down mark to the mid mark is achieved by taking the difference between "Distance D + Takeoff Distance" and "Distance A". This method of approach development will give the coach and athlete a chance to experiment and work together on what improves mechanics, positions and corresponding results. I believe that it is a superior alternative to approach development as compared to other methods specifically with regards to the curve and radius measurement. It has also saved me hours of practice time in the process. Since it gives a more precise measurement of where an athletes approach should be, the changes that are made are very small. There may be a change of a few inches instead of changing a few feet from practice to practice. This means more practice time devoted to being able to teach a skill with consistency and less time in a trial and error search. As the athlete masters an approach, do not be afraid to experiment with new measurements. Changes to the approach will likely happen throughout an athlete's career based on maturity, strength, speed, and technical mastery. I think it is beneficial to be able to keep a record of approach maps on individuals to see how they progress over their careers. REFERENCES Becker, J., Kerin, D., & Chou, L. (2013). Consequences of Deviation From the Curve Radius In The High Jump Approach. Taipei, Taiwan: Conference of the International Society of Biomechanics in Sports. Chang, Y. & Kram, R. (2007). Limitations to maximum running speed on flat curves. Journal Of Experimental Biology, 210(6), 971-982. http:Ildx.doi.org110.12421jeb.02728 Dapena, J. (1995). How to design the shape of a high jump run-up. Track Coach, (131), 4179-4181. Dapena, J. & Ficklin, T. (2007). High Jump Report #32 (Men) (pp. 2-4, 24). Indianapolis: USA Track and Field. Dapena, J., McDonald, C., & Cappaert, J. (1990). A REGRESSION ANALYSIS OF HIGH JUMPING TECHNIQUE. Medicine & Science In Sports & Exercise, 22(2), S17. http:Ildx.doi.org110.1249100005768- 199004000-00098 Kerin, D. (2015). The Curve Run & US High Jump. Presentation. Dusty Jonas is an assistant coach at the University of Nebraska where he has coached nine Big 10 champions in the High Jump. Following his own very successful competitive career at Nebraska, Jonas competed for Team USA a total of eight times in his career, including the 2008 Olympic Games and the 2010 World Indoor Championships where he earned a bronze medal. |
