|
By: Jason Kilgore Originally Published in: Techniques Magazine Provided by: USTFCCCA
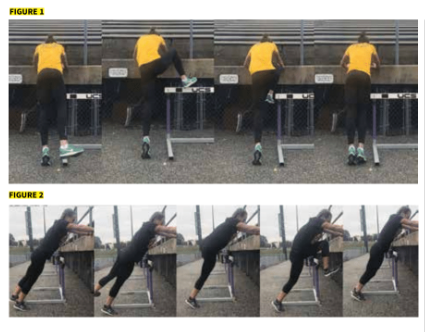
The sprint hurdles is a unique event, and there are many drills and training philosophies that exist. This article aims to provide a simplified approach that focuses on the most important factors needed for success in the sprint hurdles. While this article will discuss exercises, training concepts, and progressions, it is not meant to be a universal solution. Track and field enables incredible creativity in developing methods to teach skills and technique, but can sometimes cause athletes and coaches to get away from the fundamental skill of hurdling. Success in sprint hurdling requires a high rate of speed, power to be able to HURDLE CLEARANCE AND SKILLS The first of the three areas will be referred to as hurdle clearance skills. This will encompass technical exercises that will help athletes feel positions, develop mobility, learn concepts and learn movements, to which we later add speed and intensity. A quick search on the internet or glance in hurdle books will yield hundreds of drills, and it can be very difficult to determine which ones to use and when it is appropriate. The exercises listed below are those I use the most frequently with the athletes that I coach. These are not comprehensive and other exercises may be used as needed on an individual basis, but these exercises provide the framework to be able teach the skills needed to move into full hurdling. It's important to note here that the coach, not the drill or exercise, is the teacher. Simplifying the movement of hurdling itself, we have the takeoff, the lead leg and the trail leg. The takeoff leg initiates movement through the hurdle for clearance. After toe off, the takeoff leg then becomes the trail leg, moving over the hurdle second to the lead leg. This leg is the driving force in hurdling as it provides the needed forces to move through the hurdle and then re-accelerates the athlete as the trail leg coming off the hurdle. The lead leg moves over the hurdle first and is the leg that is landed on after clearance before the trail leg can complete its re-accelerating action off the hurdle. It is my belief that the actions of the takeoff/ trail leg are so much more important that we spend the majority of our time with exercises that focus on that movement, while coaching the lead leg inside that framework. The first exercise we'll look at will be the wall trail leg drill. This exercise is pretty simple and is a staple of beginning and experienced hurdlers. SETUP (SEE FIGURES 1 AND 2) Place a hurdle 2-3 shoe lengths away from a wall or fence. This needs to be high enough so athletes can lean into the hurdle at about 45 degrees from the ground and be able to support themselves with hands around shoulder level. Keep the height of the hurdle low. This is a teaching exercise, so hurdle height does not matter. Movement, speed and the momentum during actual hurdling are very different compared to stationary drills, so there is no need to have athletes do this exercise at race heights. As mentioned earlier, athletes should lean against the fence having their body make an acute angle with the ground. The side of the body closest to the hurdle will be the trail leg in this exercise. We'll do the exercise in several different progressions. The first progression is to teach proper sequencing of trail leg movement: TRAIL LEG FOOT EXTERNALLY ROTATES With their trail leg extended slightly behind their body, athletes will raise their trail leg a few inches off the ground. Athletes will then turn their foot away from the hurdle so it is parallel to the ground. Trail Leg Knee comes straight up to armpit, Trail Leg Foot comes up close to butt. It's important that athletes keep the foot externally rotated and parallel to the ground while bringing the knee straight up and getting the heel as close to their butt as possible. Trail Leg Rotates forward and over the hurdle, with knee in front of the body and facing straight toward the wall. Athlete should try to keep their knee in a high position and their foot as tight to their body as possible. This shorter lever will rotate forward faster and allow them to get their trail leg in the front quicker. Trail Leg aggressively drives down and backwards. In this stationary version, we want athletes to feel the foot drive down beside the other foot on the ground, returning to its original starting place. This allows athletes to feel the down and back action of the trail leg. The fence or wall acts a constraint, preventing athletes from opening at the knee joint and over reaching in the front. We initially implement this exercise by having athletes move to a cadence and feel individual positions. On command, athletes will:
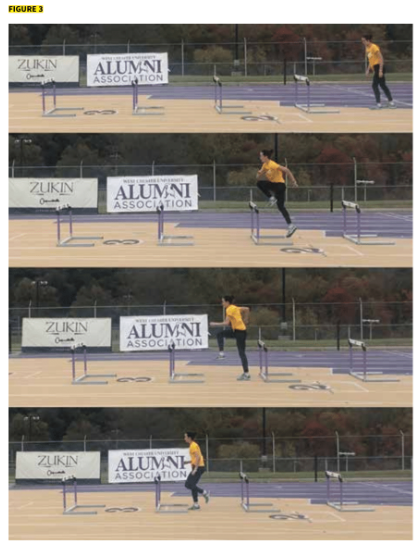
After moving through the correct sequencing and positions on our command, we will let athletes move at their own rhythm. We will give the commands to pick their foot up, turn their foot out, and then GO! On the go, we look to see that they can move through the remaining steps seamlessly. Early in development, ensuring proper movement and sequencing is much more important than the speed of each movement. I have found it is very easy to add speed of movement to this activity as you go, but emphasize teaching and executing the correct movements first. We'll further advance the exercise by having athletes pick their foot up off the ground followed by a GO command. Just as in the commanded phases, ensure that the foot externally rotates before the knee is lifted. The external rotation of the foot helps ensure that the knee and foot are moving over the hurdle and the rotary action of the trail leg moving to the front side of the hurdles body is set up. Once athletes are moving through the trail leg action correctly, the exercise can be done fluidly without pausing. We'll next take the movements and ideas from the stationary trail leg drill and add some movement to it. Adding movement will allow athletes to start to feel force application at both takeoff and re-acceleration of the trail leg. The exercise we first use for this is what we call the "Anderson" drill. We call it that because I first saw it used by coach Vince Anderson. This drill is essentially a moving trail leg drill. SETUP We typically use three or four hurdles spaced 5 yards apart; however, you can use as many hurdles as desired. The hurdles are typically set on the lowest settings, but can be adjusted based on the athlete. New hurdlers can use 18" hurdles, or hurdles tipped over, while more powerful and advanced athletes can raise them up slightly. Athletes will stand inside the base of the hurdle with their lead leg draped over the front of it. To perform the exercise, they will push hard on their takeoff/trail leg and jump up in the air. As they leave the ground, they will complete the same trail leg movement from the wall (foot turns out, knee up/heel to butt, rotates around to the front, re-accelerate into the ground). Since this is not a specific exercise, but teaching the trail leg, we're not worried about excessive flight times. If it is performed correctly, the trail leg re-acceleration will create a "pop" off the ground that will move them toward the next hurdle. Athletes will then stop at the next hurdle, drape their lead leg over the hurdle and repeat the exercise until the course of hurdles is completed.
The next exercise we use to progress the teaching of hurdle clearance and technique is continuous take-off drill. It takes the movements of the first two exercises SETUP We will typically start with four hurdles, but have extended out to 10 with more advanced older athletes. Typical spacing is 6-7' apart from hurdle rail to rail. Athletes will start behind the first hurdle and will take one step into the first hurdle. Upon clearing the first hurdle, the goal is to complete the trail leg positions as fast as possible and continue taking off through the entire course of hurdles. The main focus is the action of the take-off/trail leg complex; however, this exercise allows the coach to teach other concepts such as timing and lead leg action. When evaluating this we look for the following:
Throughout the Anderson Drill and the Continuous Takeoff drill, the aim is for the sequencing from the wall drill to transfer to these more complex tasks. Athletes MUST move the knee up first to create space over the hurdle and allow for the proper timing of trail leg rotation to the front of the athlete. As we use and continue to implement moving exercises, we are also looking for proper timing of the legs as athletes land off the hurdle. A common Our initial hurdle training consists primarily of these exercises. As the season progresses, the exercises will be used as an extended, specific warm up and eventually cycled out. Our athletes use lead leg and trail leg marches, as well as skips on the outside of the hurdles as mobility exercises. These can be opportunities for some teaching, but are mobility exercises for the entire team and not specific to hurdling. The final series of exercises that we do for hurdle clearance skills will get athletes progressing closer to full hurdling. We start off with one hurdle. It doesn't matter where you set it up, but we place it on the first hurdle mark. The hurdle is set at the lowest setting for women and the intermediate height for men. We have athletes start around 6m back from the hurdle and take four steps into the hurdle. This allows athletes to takeoff and move through the hurdle while adding some speed to the movements of the exercises introduced earlier. We progress this exercise by adding two more steps (six steps) to the first hurdle and adding additional hurdles to the course. When we first add additional hurdles, we will place them at normal hurdle marks, but have athletes run five steps between the hurdles. Our goal is to observe athletes quicken through the last two steps going into the hurdle and quicken the two steps coming off the hurdle. The rationale for doing this is to get athletes to be very active, getting their feet down directly under their hips. A common flaw in younger hurdles is "landing" at takeoff, which tends to happen when athletes are not as active putting their feet down. We then progress to three step rhythms off of four or six steps to the first hurdle, three steps allows a much quicker rhythm at very reduced (4-6') spacing. These exercises blend into our specific hurdle rhythm and hurdle speed work that we will address later. APPROACH TO THE FIRST HURDLE The second of the three focus areas with athletes is the approach to the first hurdle. We feel that responsible sprint training and hurdle training will begin with teaching proper acceleration technique, building strength and power, and developing absolute acceleration ability from the onset of the training. The ability to under-stand pure acceleration, not nuanced for a specific event, is critical for developing the approach to first hurdle, but also in As video analysis from the most recent United States Championships demonstrates, comparison of the sprint hurdle finals and 100 meter finals showed the hurdlers were only slightly slower than the sprinters at the 10m, stressing the importance of acceleration and speed into the first hurdle. The difference in how athletes execute in the hurdles versus the sprint lies in how quickly athletes rise through their body angles. Hurdlers need to ensure they are upright and ready to take off into the first hurdle at step 8. When applying acceleration patterns to the sprint hurdles, we will use two different charts to pull information from. Both charts can be found through a search on Google, but I received the first chart, step patterns to the first hurdle, from Coach Ron Grigg during my USTFCCCA mentor-ship. The second chart is from a presentation from Coach Curtis Frye with the approximate take off distances based on the hurdler's height. The taller the hurdler, the closer they can take off from the hurdle because they don't need to raise their center of mass as much as a shorter hurdler needs to. As we begin to develop the approach for the first hurdle, we will place chalk lines on the track based off Coach Grigg's chart and a cone down at the approximate take off distance. Depending on the skill level, height and ability of the hurdler, there will be some variance in these marks. Caution should be used in having athletes worry about the marks instead of using them as a tool to help guide the coach's assessment of their first 8 steps. For complete novices, we will either tip the hurdle over, use wickets or just remove the hurdle completely for the first couple trial runs on their approach. Special care is placed on watching how body angles rise and getting into a good upright position for takeoff into the first hurdle, while being aware of where athlete's steps land. The athlete's ability to accelerate will determine how many steps they are "pushing" for from blocks. We will initially ask everyone to accelerate hard for the first for 4 steps and then "pedal" the next 4 steps into takeoff. The term pedaling is a cue used by Dan Pfaff (among others) to encourage athletes to quicken the rhythm of their steps as they get closer to successfully navigate the spacing between the remaining 9 hurdles. Older, more experienced athletes, will either go over a tipped hurdle or over a hurdle with the height lowered. Depending on past performances and ability level, we will typically have them start off with three hard pushes and five pedals, quickened steps into the first hurdle. It's important to note that the approach and how long your hurdlers push can change throughout the course of a career and even a season, which is why care must be taken to note takeoff marks. As new hurdlers get more comfortable applying their absolute acceleration ability and skills to the approach to the first hurdle, they will continue to bring more momentum and speed as well as cover more ground during the initial steps. For veterans and experienced hurdlers, sharpness throughout the season may require adjustments to be made. A common issue that arises with hurdlers in their approach to the first hurdle is using seven versus eight steps. While the world record performance and many world class male hurdlers use a seven-step approach to the first hurdle, I do not recommend teaching it initially or if a hurdler is performing at a high level. In the women's high hurdle race, seven step approaches aren't as common, but the same recommendation applies. The biggest aversion to this is the huge shift in rhythm that it creates for the majority of hurdlers. Many athletes could potentially hit the approach steps to the first hurdle and get their takeoff foot down at the mark, but most often this is accomplished through a reaching action as opposed to good acceleration mechanics; or athletes pushed for too long, and now the rhythm they will need upon landing off the hurdle will be much faster than what they have developed going into the first hurdle. As discussed above with technical drills, we are looking for the takeoff step into the hurdle to be quick and as close to underneath the hurdler's center of gravity to allow the hurdler to move through the hurdle. RHYTHM AND HURDLE SPEED The final area that will be addressed is the most important and critical for hurdling success: developing speed and rhythm between the hurdles. In the words of Coach Vince Anderson, "You get ready to race by hurdling, full blow!" As we get into fast hurdling, it is important that our athletes are still moving their takeoff/trail leg in the sequence that was described and taught in our stationary and basic hurdling exercises. When working on rhythm and hurdle speed, it is important that we know what splits our hurdlers are running between hurdles. The splits we predominantly use are from touchdown off a hurdle to touchdown off the subsequent hurdle. I will try to record all hurdle splits but also may have to us total splits. For example, if we are going over 4 hurdles, I will time touchdown after hurdle 1 and then after hurdle 4 and divide that number by three to get average rhythms. Filming hurdle sessions and using a program like dartfish and its timer function is something we use to get more accurate splits from both practices and meets. Getting our hurdlers to achieve meet-like rhythms in practice can be a challenge, and therefore reducing the spacing between hurdles and lowering hurdle height is critical. We want the hurdlers to get used to feeling FAST hurdle rhythms and moving THROUGH the hurdles. By manipulating these variables, we can put our hurdlers in position to run fast and technically sound without the added adrenaline that is associated with competition. There are a few ways that spacings can be manipulated to achieve the desired split times. Before broaching this topic, it is important that we know what we are trying to run. A very general rule of thumb/estimate of what splits equate to over the race distance are: 1.0 = 13.0 1.1 = 14.0 1.2 = 15.0 1.3 = 16.0 In presentations by Coaches Gary Winckler and Dennis Shaver, a split chart created further breaks down race times into the first hurdle, each hurdle split, as well as the run in after the 10th. This chart allows you to get a more detailed break down and guide of how to structure rhythm training and can be found in higher level coaches education courses or a quick search on Google. Careful monitoring of split times can allow the coach to adjust hurdle spacings to ensure the hurdlers are running faster than their current time or in line with what their goal times are. So how do we adjust spacings? If you're pressed for time, coaching a large group of athletes or multiple events at once, you can set up multiple lanes with hurdles discounted at different distances (1',2',3' etc.) and adjust the lane or spacings the hurdler is running on based on their splits. You can set the spacings based off their current level with the intent of running 1.0 between the hurdles. For example, if based off the charts you determine your hurdlers average rhythm unit (split) is 1.15s, if you take the distance run (9.14m for men and 8.5m for women) and divide it by the rhythm unit, it will give you the distance to set the hurdles at to run 1.0 (7.94m for men and 7.40m for women). From here, once they have run 1.0s rhythms consistently and technically sound, you can add 10cm per hurdle (8.04m and 7.50m). Throughout the course of the season and career, these marks will change. Careful attention to rhythm units will dictate when adjustments to spacings need to be made. As we pay attention to the times that are being run, it's still very important to be aware of what the takeoff and trail leg are doing. As mentioned earlier, marking takeoff and touchdown on each hurdle is very important to ensure athletes are getting takeoff feet down, being active, as well as racing the trail leg forward off the hurdle. To quote Dan Pfaff; "If you don't respect takeoff spacing, bad stuff happens". We will place a cone 6'6" away from each hurdle and 5' past each hurdle to evaluate the takeoff movement. As we mentioned earlier, we measure all of our athletes' greater trochanter length. From that data, previously collected data, and data from "The Mechanics of Sprinting and Hurdling" by Dr. Ralph Mann and Amber Murphy, we know that once takeoff is factored out of the spacing of hurdles (approximately 3 meters, leaving 5.5m and 6.14m to run) that normal stride lengths will have to be compromised. As mentioned above, when teaching the takeoff and cut step, we are teaching our hurdlers to be active and trying to get their foot as close to under the hips as possible. With this shortened step, it is very important that the trail leg steps off of the hurdle and the second step between the hurdles continues to build or maintain speed as the race goes on. Mann's data shows us that the trail leg step (1st step) is the shortest. This makes sense as we're trying to "re-accelerate" off the hurdle, the 2nd step is the longest and the cut step/takeoff step is the quickened or shortened compared to the 2nd step.
Much of what we do revolves around the takeoff/trail leg movement. While the lead leg is important, I feel that it can be taught within the framework and context of the exercises and programming specific to hurdles described above. A well-rounded sprint, power and strength program will address takeoff ability, speed, and you can program exercises to teach the switching action of the thighs. All of these things can be referenced when hurdling. A proper As you can see, so much of what we are looking for in the pursuit of success and excellence in the sprint hurdles is based on simple movements and concepts. Teaching our athletes the proper sequencing of the movement of the trail leg, how takeoff and trail leg work together to move through the hurdles, correctly approaching the first hurdle and being patient when adding more complexity and movement, as well as developing power and speed simultaneously will result in increased performances and higher levels of performance. While this article is not meant to be a comprehensive look at the sprint hurdles or exercises used to develop athletes in the event, it sets the framework to create proper movement patterns and understanding of the event to allow your athletes to progress to higher levels of success. REFERENCES Vince Anderson, Texas A&M Track and Field Series – Drills and Progressions for Championship Sprint Hurdles (DVD). Vince Anderson, Kebba Tolbert, Tommy Badon USTFCCCA Sprints and Hurdles Specialist Course. Karim Abdel Wahab A Methodical Dennis Shaver, Kebba Tolbert, Tommy Badon USTFCCCA Hurdles Master Course Ron Grigg USTFCCCA Masters endorsement mentorship Curtis Frye The High Hurdles: How to achieve fast times. 2008 USATF National Podium Project Presentation. Tom Tellez, Mike Takaha The Hurdles from Start to Finish Boo Schexnayder Simplified Coaching in the Spring Hurdles Gary Winckler Practical Biomechanics For the 100m Hurdles. USA Track & Field Heptathlon Summit- November 1994. JASON KILGORE IS THE DIRECTOR OF TRACK & FIELD AND CROSS COUNTRY WEST CHESTER UNIVERSITY IN PENNSYLVANIA. |
