|
By: Jake Brydson Originally Published in: Techniques Magazine Provided by: USTFCCCA
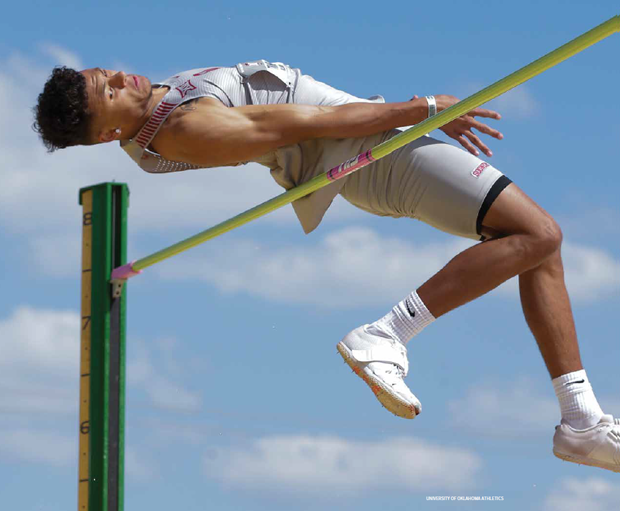
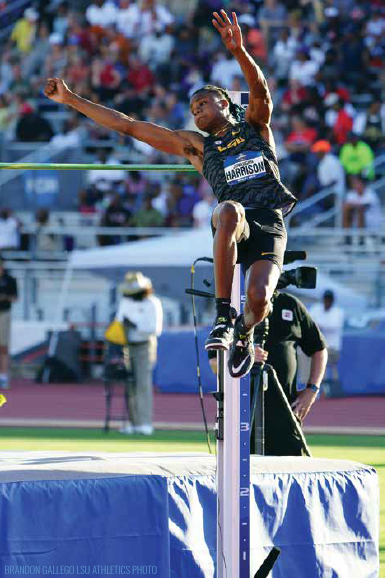
There is an old adage that "crossbars don't lie," and while true, that statement only scratches the surface of the vertical jumps. While the other field event winners are evaluated strictly on distance traveled of implement or athlete, the champion of a high jump competition is not decided on the peak height achieved, but on the highest bar cleared and consistency of clearances. Quantification of success becomes equally anecdotal as empirical, with how the bar was cleared sharing importance with if it was cleared. On top of all this is the inclusion of a non-linear approach and submaximal speeds that allow for different styles to permeate throughout the event. Styles that are born from each jumper's unique backgrounds, body types and movement signatures serve their purpose, but it's a dangerous game to ignore the biomechanical truths to continue to feed an ineffective mechanism. Common errors are not random or accidental but are instead interwoven critical junctions where skill and execution are challenged most. In this article, we will be looking deeper into the technical model and biomechanics that drive successes and failures in the event and where the common errors stem from. THE EVENT IN ALL 3-DIMENSIONS The presence of an unrestricted curve creates a unique challenge that is shared with no other event. The jumper has full control over the length, radius and position of their curved approach. Because of that, the high jump apron becomes a 3-dimensional plane, with an x, y, and z axis all involved in the summation of forces at takeoff, which dictates the Identifying and solving problems in a triplanar fashion requires a deeper understanding of the technical model and the consequences of derivatives from that model. TECHNICAL MODEL AND 3-DIMENSIONAL ERRORS For clarification purposes, we will use the traditional 10-step approach as our base model. THE STRAIGHT Natural selection of the high jump favors quick twitch, springy athletes with great eccentric qualities. Until the athlete is well-rounded from a bio-motor standpoint, a static starting position in the approach will be less effective at generating velocities initially than a dynamic one. A coach must weigh the pros and cons of potential starting strategies, but the consistency and rhythmic qualities of a static start are preferred. A skipping or walk-in style approach can lead to greater velocities, but at the expense of a large margin of error at checkmarks. In a pinch, a short-term fix for a jumper with great eccentric qualities and subpar static qualities would be trying to standardize a skip-in approach. In the long term, it is best to continue to address static power qualities and stick with a traditional rollover approach. During the straight, each step should adhere to sprinting principles. Each step gets progressively more upright, culminating with a fully upright position entering the curve. Tracking this is best done by monitoring the shin angles and their relationship with the torso angle. Vertical undulations of the center of mass generated in this phase will be what is amplified at the takeoff. This "bounce" is generated by deliberate vertical pushing and efficient striking mechanics. It is then preserved by CURVE INITIATION How a curve initiates from the start could be the most vital part of the approach process. If an athlete does not properly prepare and generate inward pressure going into the 6th step from the 5th, the chances of the curve properly originating drastically decrease. Step 4: The 4th step of the approach should show upright sprinting qualities, while also acting as preparation for the upcoming inward displacement of the center of mass. Step 5: The 5th step executed correctly will fall slightly outside the original linear path, with the center of mass continuing to track in a straight line. The hips and feet will begin to slightly angle inward, beginning the process of initiating the curve. Step 6: When steps 4 and 5 are executed correctly, step 6 will fall slightly inside the original linear path, angled inward, with the inward lean beginning to be manifested due to the centripetal force. TURNING AND PRESSURE Pressure should be originated from the ground and with a line of force traveling directly from the ankle through the outside knee, through the hips, through the shoulders, and out of the top of the head. Inefficient leans manifest into insufficient rotation on multiple axes, with premature shoulder rotation and insufficient somersaulting action during takeoff. As we covered above, the shin angles during the straight of the approach tie directly into this, across all planes. A jumper with a forward rotated pelvis or rounded upper back will also have acute angulation of the shins. All of this results in a poor curve initiation. Pressure directed outward through the outside foot is the most efficient way to create inward lean and centripetal force. With each contact of the outside foot, the inward lean and pressure should build deeper and deeper. The inside foot should ideally be landing underneath the center of mass, preserving centripetal force. The role of the inside foot as a force generator is secondary, yet still important to the process as a whole. As a remedy, the athlete should be taught and reminded to feel the turning of the outside foot in all curve-related activities. Most commonly, a curve with insufficient turning and initiation will show an underdevelopment of curve mechanics on step 6 and an overcorrection of the angle of attack on step 8. This is a critical junction, as many common errors can stem back to this point. Tracking the far standard visually upon entering the curve also helps with steering towards the takeoff. Knowing that takeoff is most efficient at a 35-40 degree angle to the crossbar, this creates the requirement of a shift from 90 degrees to 35 degrees over the span of the curve. While arithmetic would show an average of 11 degrees over 5 steps, the deceleration that would occur from that abrupt of a change on step 5 would kill horizontal velocities. Instead, athletes should strive to progressively reduce those angles of attack as efficiently as possible, with the first step being roughly 3 degrees inward. Done properly, this also begins to close the horizontal distance from the origination of the curve toward the takeoff. TAKE-OFF It is important to understand that the steps leading into takeoff take care of many key factors for takeoff. Flight paths are predetermined once any projectile leaves the ground, and that includes the high jumper. As the athlete grounds the takeoff foot and initiates the takeoff, both the vertical parabola and tangential path are created. The height of the vertical parabolic path is a result of the transfer of horizontal velocity to vertical velocity, with a large eccentric load into the takeoff leg to create vertical force. The quality of an eccentric contraction correlates directly to the quality of the pre stretch. Since ground contact times range from .15 to .20 seconds, there is simply not enough time to realign the body upon touchdown. Alignment of the torso and pelvis is done during the penultimate step, in preparation for takeoff. Bar clearance and drapage about the bar are a result of the summation of forces generated earlier in the approach. During the takeoff, the jumper will continue to rotate their hips and shoulders in the same manner in which it happened during the approach. The hip of the swinging free leg will track in a curved path, angled towards the back corner of the mat upon toe off, continuing to a parallel with the bar position at the peak of flight. The inward lean generated during the approach manifest into somersaulting rotational forces, as the body goes from a vertical to horizontal orientation. This, coupled with the previously mentioned rotational forces, will do the work in creating the "flop" technique.
PROBLEM SOLVING USING CAUSE AND EFFECT, 3-DIMENSIONAL THINKING THE STRAIGHT Because of the simplicity of asking, "Did They Hit Their Checkmark?" coaches often lose sight of how they got there and what is coming next. Instead, as a coach you should be looking at the checkmark as an evaluation point of horizontal velocity, postural alignment and vertical undulations of the center of mass. Athletes have much more experience running in a straight line than running a curve, often making this the part of the process that gets amped up in an athlete's attempt at putting more effort into the jump. Often, as an athlete is attempting a new PR, they juice up this back part of the run. Increased horizontal velocities lead to a greater result in theory, Practical Application: A major benefit of aligning your sight with the side of the approach is a much easier perception Reaching and improper striking mechanics outside the center of mass are much more noticeable from the side. Postural flaws that result will be easiest to quantify from this viewpoint as well. Transferring the same coaching points used in horizontal jump approaches to the apron from this perspective is a very efficient idea and effective practice. THE CURVE - ENTRY, EXECUTION, AND MAPPING CURVE ENTRY In the discus and hammer throw, entry into rotation is arguably the most scrutinized, and high jump coaching practice should be moving towards that, as well. In the high jump, the 4th, 5th and 6th steps are of paramount importance, and coaching practices should reflect that. Turning initiated on the inside foot will be of a pivoting fashion and will lead to excess deceleration throughout the ground contact. In addition, the shearing forces experienced on the lower leg during a pivot is a major cause of knee and lower leg injuries in high jumpers. This poses a major injury risk, and could shorten or end a promising jumper's career. A jumper who fails to turn on the proper step will be forced to pivot and run a shallow curve, in a path nearly straight down the bar, over their last 3 steps out of necessity. This is also the first opportunity for a curve that is too narrow to create problems for the approach. A jumper who is fit to a curve that is too restricted will often have an excessively displaced outward 6th step as the jumper steers into a more apt fit curve. While this can create some displacement that's aesthetically similar to a lean, with the foot outside the center of mass and the inside shoulder below the outside shoulder, it is not optimal towards creating inward pressure due to the radical nature of stepping out. Practical Application: The vantage point directly behind the athlete and high jump apron is ideal for quite a few technical observations. The first and most important is the curve initiation and progressive reduction towards the takeoff. From this back angle, you can best spot the initial turning of the foot and initiation of the curve in the first two steps of the typical 5-step curve, a common error and a near-impossible hole to dig out of. The subtlety of these movements at the top of the curve creates a situation where it is often tough to measure the magnitude of these movements. Viewing from the side limits the ability to gauge the amount of turning with each step. Preservation of velocity is an indicator of successful initiation, as well as proper reduction throughout the approach. CURVE EXECUTION A common rule of thumb is tracking the angle of the torso towards the center of the curve. When coupled with a line of force directed from the ankle to the head, it is an effective way to evaluate lean. However, an over-emphasis on the shoulder alignment will lead to faulty mechanics if it does not generate from the ground. Practical Application: When viewing the curve from straight on from the inside, tracking the efficiency of the curve becomes an easier task. If the athlete is maintaining alignment with respect to the center of the curve, the chances are very likely the curve had great initiation and pressure. One potential red herring a coach should be aware of would be fixating on the orientation of the shoulders and not the total body lean. Athletes who do not understand how to generate inward lean organically will do so artificially, by dropping the inside shoulder and twisting the shoulder axis. Once you are accustomed to seeing this, it will become clear as day. Resulting problems at takeoff or clearance should nudge you towards evaluating the total body lean. CURVE MAPPING The fit of the curve itself can lead to athlete compensations to make it to the takeoff spot, by any means necessary. Both too little and too much space will lead to drastically different curves. An athlete with too little space is very easily confused with a poorly executed curve. Practical Application: Altered mechanics would be an indicator of too little space, and an athlete feeling "too close" is often due to a faulty curve. Move the athlete with altered mechanics back if the range of motion is tightening. Move their curve out if they are pushing less aggressively outward to keep the curve comfortable and coordinated. An athlete that is too far out will either b-line straight at the takeoff spot and run a "skinny post" or overextend their strides to try and reach there. The concept of steering is researched heavily and comes into play here. To borrow from Boo Schexnayder, "An athlete will never take off too far away, they just won't jump." TAKEOFF AND BAR CLEARANCE During the takeoff, one example of a poorly executed takeoff is illustrated when a jumper has aligned their upper body towards the bar before the takeoff has been completed. When lacking total body lean, an athlete will have their shoulders and head move past the vertical axis and towards the bar. This bent position is commonly referred to as "blowing through the takeoff." Upon leaving the ground, this will limit the somersaulting forces and leave the athlete in a drawn-out draped position over the bar. If pressure is established ineffectively on the previous steps, the athlete will compensate by lowering excessively. An overly linear, shallow path of attack is also common. Both often result in an athlete prematurely rotating their shoulders towards the bar to set up a volitional flop. A common error in the penultimate step is stepping outside of the curve. Often, this is tied to faulty curve mechanics and is a final effort to lower the center of mass inward. Unfortunately, this causes the athlete to step down the bar at takeoff and contort themselves to inorganically drape over the bar. This also creates an inefficient flight path and long times over the bar. Occasionally, a jumper will have an overly quick penultimate step, due to premature loading of the jump. If a jumper becomes too preoccupied with the takeoff and begins lowering in preparation too soon, their penultimate step will land toe first and inhibit a proper pre-stretch during takeoff. **Practical Application: A jumper feeling "too close" can mean a few different things, from insufficient centripetal force on the approach or inadequate space between the takeoff and the bar. A true issue in draping mechanics would be seen well from the side angle, but often, it's a result of a premature rotation of the shoulders towards a parallel with the bar orientation. Stepping out of the penultimate and down the bar is a common error that we have discussed throughout this article. An athlete who is out of space and using the penultimate to steer is less common than one that is steering outward as a final effort to generate any sort of inward pressure. Shallow landings and excessive travel over the bar would be signs of an inefficient path, commonly stemming from a lack of centripetal force at the takeoff. An athlete could have every intention of running the curve properly without the space to execute, so it is on the coach to adjust fit or technique in that situation. Additional Practical Application: Viewing the high jump from behind the mat provides a different perspective that can be extra valuable in certain aspects, one of which is magnitude of movements and rhythm of the takeoff. From behind the mat, there is often an obstructed view of the feet on the last few steps, which is a drawback to this viewing angle. However, what could appear to be minor from the back of the apron is magnified when you are closer to the action. An athlete that establishes great pressure on the curve has a different sounding takeoff and different tangential path than one who is hitting positions without great amounts of pressure. When directed straight towards you, it becomes easier to delineate the good from the great. Additional Practical Application: Working backwards from the landing, the athlete should "feel like they're landing across their shoulders." If an athlete is landing flat on their back and not the shoulders, rotational forces aren't properly created. Smart coaching practice is working backwards through the checklist of potential flaws to identify where the flaw originates. If an athlete is not perpendicular to the bar and aligned with one standard upon landing, the rule of thumb is that they came out of the curve and took off more linear down the bar. REFERENCES FOR FURTHER ON THIS TOPIC Jesus Dapena, "The High Jump" and all related research Dave Kerin "The Curve Run and US High Jump", "Consequences of Deviation from the Curve Radius in the High Jump Approach" (with Becker and Chou) Boo Schexnayder "The High Jump" (DVD), "Common Errors in the High Jump", and "Special Considerations for the High Jump Approach" Jim VanHootegem, Todd Lane "USTFCCCA Academy Jumping Event Specialist Course" Todd Lane "High Jump A-Z", "The High Jump" 2018 USTFCCCA Convention Presentation on High Jump Dan Pfaff "More Makes and Fewer Misses - Perfecting High Jump Technique" (Altis Presentation) JAKE BRYDSON IS AN ASSISTANT COACH AT MISSOURI STATE UNIVERSITY, OVERSEEING ALL FIELD EVENTS. HE HAS RECEIVED BOTH JUMPING EVENT AND COMBINED EVENT SPECIALIZATION CERTIFICATIONS FROM THE USTFCCCA TRACK & FIELD ACADEMY, AND IS WORKING TOWARDS MASTER'S CERTIFICATION IN THE HORIZONTAL JUMPS. |
