| Shooting Drills
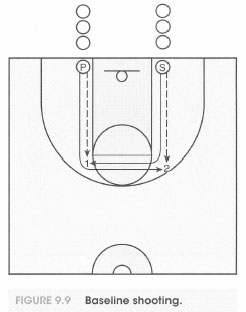
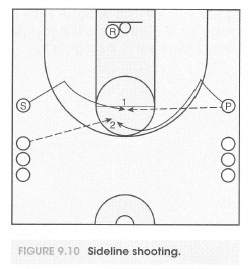
This is another great team drill. As shown in figure 9.9, this drill begins with lines of at least three players positioned under the basket at the free-shot lane. Everyone has a ball except one player, who will be in the front of one of the lines. This player starts out going up the lane line to the elbow. Once at the elbow, the player plants the inside pivot foot and points the toe of the pivot foot in the direction he or she is going. In this case, the player continues on to the other elbow and plants the same inside foot, heel to toe, angling himself or herself to the basket and preparing to step into the shot (shown as S in the diagram). The player at the baseline standing across from the shooter will deliver the ball so the shooter can catch in rhythm (shown as P in the diagram), and then continues the drill by going outside of the shooter he or she just passed to and planting his or her inside foot at the elbow, preparing to catch and shoot with a consecutive pass delivered from the opposite line. The footwork and movement will be the opposite of the previous shooter because the player will be going the opposite way. Points of emphasis include making angle cuts, stepping heel to toe, staying low, passing the ball to the shot pocket, calling for the ball, and catching, shooting, and landing on balance. Remember to shoot and stay. This way you can track the long rebound. If you follow your shots, you will often see the ball miss and go right back to where you just shot from. Always shoot and stay. Coaches can have players make a certain number of shots, or they can time this drill to see how long it takes player to make a certain number of shots. Keep the drills competitive. It creates an incentive to improve.  This drill is similar to the baseline shooting drill, except that it runs from the wing areas in two lines positioned at each free-shot line extended, outside of the three-point line. As shown in figure 9.10, the first shooter begins at the front of one of the lines without a basketball (shown as S in the diagram). He or she V-cuts across toward the opposite line and receives a pass, pivoting heel to toe off the inside foot and rising into the shot. The passer (shown as P in the diagram) then becomes the second shooter, running outside of the player he or she passed to in the opposite direction, and pivoting off the inside foot (the opposite foot). When the drill is set up in this fashion, you can also add a rebounder. I like adding a rebounder because it stops the shooter from following his or her shot. Remember, you want to teach players to shoot and stay so that they can get long rebounds and key outlet passes or so that they are able to get back on defense. The only time players should follow their shots is when they shoot inside the paint. When you add a rebounder to this drill, they will retrieve the ball and then dribble it, preferably with the weak hand, to the line that the ball was passed from.  You now possess the knowledge necessary to become an effective shooter and scorer when coming off a screen. However, none of this means anything unless you're willing to put in the time and effort to perfect these fundamental skills one by one. How good or great do you want to become? |


