| Defensive Line Drills and Technique |
| By: Donnie Roberts - Lehigh Univ.
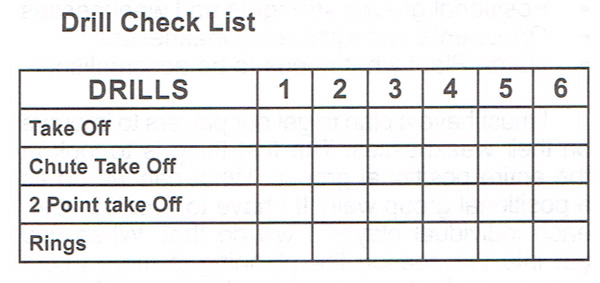
Originally Published in: Nike 2016 Coach of the Year Clinic Football Manual - Earl Browning Provided by: Nike Coach of the Year When you give a lecture like this it is always good to start off with a joke. I am not going to tell a joke. You always hear people say, "I am not a smart man..." and they always say "but" and then they say something extremely intelligent. I am not a guru. There are some things I want to share with you. These are not original ideas. I got them from other defensive line coaches. I am going to show you the drills we do and how we teach them. When you see your players in drills and watch them play in games, the games are more of what you look for. When I look at the cut-ups of the games nothing is ever perfect. There are some bad things that we must get better at doing. This spring we must get better. I want to tell you my philosophy about defensive line play. I had the opportunity to do some internships coaching in the NFL. That was a tremendous experience. Everything I do is something I got from someone else and tweaked it to fit what we do. The biggest influence I had over the last couple of years came from a guy named Pete Jenkins, who used to coach the defensive line for the Philadelphia Eagles. The drills I run today came from him. PHILOSOPHY Fundamentally sound • Stance • Eyes on target - key • Takeoff • Blow delivery • Block escape • Pursue to the ball My my philosophy starts off with being fundamentally sound and that starts with the stance. When I talk about our stance from the three down front, it is a balanced stance. When we takeoff, we use what I call a "Two-foot" takeoff. We want to push off with both feet and generate the power from the hips. Our eyes are always going to be on the target. We tell them their eyes see the target and the hands hit it. If you are not looking at the target, you cannot expect to hit it. When we make contact, we want to control the block. Once we control the blocker, we work on the escape. The idea in our defensive line is for them to make plays. To do that they must get off blocks and pursue the ball. Mastering Skills Through Drill Work EVALUATION • Individual player strengths and weaknesses • Positional groups strengths and weaknesses • Opponents strengths and weaknesses • Game Plan: what needs to be accomplished I must have a plan to get our players to improve on their weaknesses. The first thing is to look at the entire positional groups. What can we do as a positional group well? If I have to tweak that for each individual player, I will do that. When you get into the season the planning is more about opponents. In the spring it is about our offensive line. Our defensive line will be going against our offensive line all spring. When I work on drills, I need to determine the skills needed by our defensive linemen. I look at long range skills. Those are things we can do every day. In the spring I want to concentrate on our long range drills. These drill are drills in the development phase. These drills are the little things such as takeoff, hand placement, blow delivery, and shedding blocks. We must master the little things, which we call "the fundamentals." DETERMINING & DESIGNING DRILLS • Fit into skills to develop • Fit into Game Plan • Emphasis - Time allotted to accomplish When you determine what drills you are going to use, you must make sure they fit into the development of the players. You cannot do drills for the sake of doing a drill. If a drill does not fit what you do in the defensive line, why do it? We want to know if all our drills fit our development of players and does it fit into our game plan. The most important thing is the time allotment you spend doing drills. I started coaching as a graduate assistant at Pittsburgh. From there I went to Lafayette. The head coach there asked me if I had a "Drill Check List." I had no idea what he was talking about. I was 23 years old and did not know much. From that point I started writing things down. Most college coaches have a drill check list. When I started using the list, it was more of a CYA chart. If the head coach came in and asked if we did that drill, I could show him. Now the check list is an integral part of my planning. I will show you an example of what is on the drill chart. Across the top of the chart is a place for dates and frequency they are done. All the drills are not done, but they are there to remind me what I have done and what I may need to do.
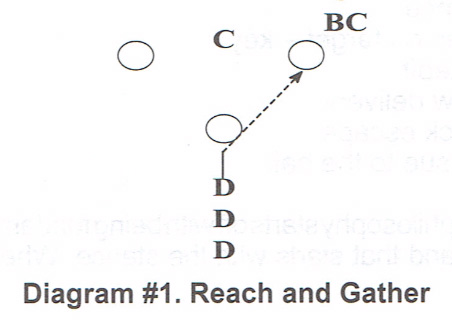
On this chart there are only four drills. On my chart there are 25 individual defensive drills. The chart is a guide for your planning. Drill Checklist vs. C.Y.A. • Determine the skill set • Be versatile - combine drills • Accomplish the goal - allow players to perform When I use the check list, I am looking at the specific drills. What drills I need to do comes down to whether we are in spring training, pre-season, or season workouts. I look at the list and decide which drills will carry us over. I am not big on agility drills. If I am going to do that type of drill it will be before we start practice. I am not going to do that during practice time. If we come out and stretch, we are warmed up. I do not need to do an agility drill to warm up. I go straight to the things we must get done to play. One of the things we work on is block recognition. We want to work the pass rush against the offensive line as much as we can and draw in individual drills. TYPES OF DRILL WORK • Individual Drills, Agilities, and Tackling • Hand Placement and Blow Delivery • Gap Responsibility and Control • Block Release and Escape • Block Recognition (group or vs. 0-Line) • Pass, Screen, and Draw Game • Pass Rush Technique In the individual drills we want to do our agility and fundamental work. What is normally a warm-up drill is becoming part of the individual drill. We work these drills as rapid fire work and with not a lot of teaching. We want to get as many reps in as we can. We want to do them repeatedly. We went to a combination of skills to allow success. We do the drills in a progression, where the players are taking the next step to the skill. When we do a combination drill we are not working on one specific aspect but a group of skills. The first drill is what we call a "reach/gather" drill. (Diagram #1) When we play against an option or zone read team, the 5-techique defender has to play the down block. It does not have to be the 5-technique; it could be a linebacker or secondary defender reading the key. However, the defender has to play the down block and be in a position to play the quarterback. The defenders want to squeeze to the inside and close the running lane inside. That is what the reach and gather drill does.
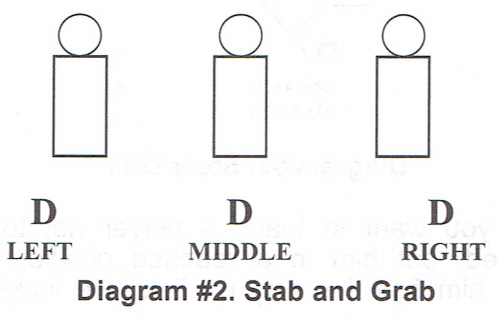
The players start in 3-point stance. I have a ball on a stick for their takeoff movement. On movement of the ball they take an attack step. That is a two-foot takeoff step. They want to pressure the hips down and come under control. The coach stands behind the first cone and points to another cone. When the coach points the player moves to that next cone. As they work to the second cone, the idea is in keeping the feet inside the framework of the body. It like a basketball shuffle except it is bigger and it covers move ground. We want to gain ground on those steps. When we step to the second cone, we want to lead step on an angle. We want to reach with the lead foot and gather with the trail foot. We never want the heels to come together. We want to reach with the lead step and gather with the trail foot, but keep a good fundamental position. If the feet come together, there is no balance. We made some changes to our defensive scheme and I got away from teaching that drill. When we watched the film I realized I needed to get back to doing this drill. It is easy to teach and it gets players into the right position to make the play. This drill came directly from Pete Jenkins. Hand Placement and Blow Delivery • Train: eyes, hands, hips, and feet "what the eyes see the hands will hit" • Teach importance of leverage - horizontal and vertical • Can use players, shields, or sleds - very versatile. Can be rapid fire (many reps) or slower tempo for technique emphasis • Teaches progression and feel of fit When we drill blow delivery and hand placement, we work on dummies as the first progression. (Diagram #2) When you talk about blow delivery, there are many drills you can do. We call ours "stab and grab." We want to train the eyes, hands, hips, and feet. The players focus the eyes on the aiming point, which is the breastplate and biceps. What the eyes can see the hands will hit. It is important for them to keep horizontal and vertical leverage.
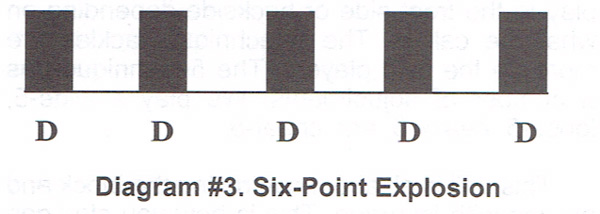
They are in a two-point stance with the hands below the knees, palm facing downward. They strike the target by sub-planting hands. The hips roll forward on contact and the feet follow (balance up). The stab is the palms striking the breastplate. The grab is grabbing the jersey and biceps. The grab is for control. We want to check their gap responsibility. In this drill we are not moving the feet other than to step into the stab. When we move the feet, we want to steer the blocker or squeeze down. If the blocker is coming at the defense, we steer the blocker. If he is going away from the defender, we squeeze. This is clinic talk. How many times do the players hit the target they are aiming for? If they do not hit the target, we do not try to reset the hands. We grab onto the jersey and fight like hell to get into our gap responsibility. I never tell my players to reset their hands. If they take their hands off the blocker, they expose themselves. Linebackers may be able to reset their hands but not the defensive linemen. Every one of our defensive players must know this drill. We use it with the defensive line, linebackers, defensive backs, and special teams. Anyone who must defeat a block knows this technique. We do tackling circuits, blitz circuits, and fundamental rotation. The stab and grab drill is one of the drills in the fundamental rotation. Every player on the defense rotates through that station on fundamental rotation. We do the six-point explosion drill. Some people do this drill every day. During the season I do it once a week. I do it on Thursday. This is more of a warm up drill. On Thursday I do not have all my players because that is a big special team's day and some are involved with that. I do a six-point drill. In this drill, the coaching point is to think of your neck being in a brace. I want the eyes always up and squeezing back with the neck. The power generates from the hips. (Diagram #3) The six-points on the ground are hands, knees, and toes.
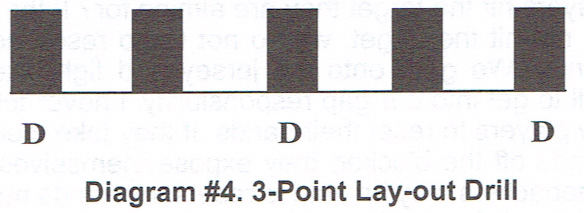
The players focus the eyes on their aiming point, which is the breastplate and biceps. On the movement of the ball, the player brings his hands from the ground and strikes the target. He does that by sub-planting hands. His hips roll forward on contact. We want the neck in a brace." After the strike, he recoils back to the original starting position. We do five or six reps of the six-point explosion in each set. You can use the sled or use dummies. The "3-point lay-out drill" is a sled drill. (Diagram #4) The players work this drill from a 3-point stance. There is no footwork involved in this drill. It is what it says it is. It is a lay-out thrust by the player. It is to a six-point stance from a three-point stance. This drill is like a sprinter coming out of the blocks. We want the players to explode out of their stance, generate their power from the hips, and launch into the sled.
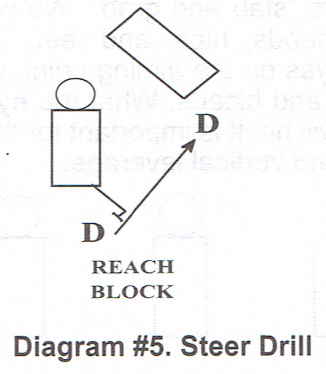
The players focus their eyes on the aiming point of the breastplate and biceps. They start from a three-point stance. On the snap the player explodes through his hips and strikes the sled pad using the stab and grab technique. He wants to roll his hips through, while keeping his feet into ground. GAP CONTROL • Teaches gap responsibility • Teaches block control and recognition • Teaches importance of leverage - horizontal and vertical • Incorporates • Reach & Gather • Stab & Grab • Teaches progression and feel of fit The next set of drills are not control drills. They are drills based off leverage. We are an odd three-man down front. We play a 3-3 stack defense. The nose controls the center and can play to the front side or backside depending on what the call is. The 5-technique tackles are more up the field players. The 5-technique has a number of adjustments. We play a wide-5, loose-5, heavy-5, and cheat-5. This drill is all about controlling the block and playing with leverage. This is how you play gap responsibility. When we do these drills we go with a progression. Every one of them start in a fitted position. We want the defensive players in the ideal position before they start any movement. Everyone in here knows the defensive linemen start with their hands in the dirt. However, he is not in that position for a long period of time. That puts him in a two-point stance in the fit position. This is a time saver in the drills. I do not have time to teach my players how to act like an offensive lineman. We want to put them in the perfect position so they learn how to roll the hips, get lock-out with the arms, and how to gain leverage. In the steer drill we work against the reach block by the offensive blocker. We work the first drill I showed you with the reach and gather. The defender wants to knock the outside hand of the offensive block off him and push it up. How many times do you tell your players not to get reached? Do you go back and show them how not to get reached? Not getting reached to some players is running to the sidelines. When players do that they open a huge seam inside that the best linebacker in the world cannot cover. Opening the seam is one problem. The other is looking for the ball. They must stay in contact with the blocker and the ball will come into the defenders' vision. When that happens, he escapes and makes the tackle. If he starts to look for the ball, he will get reached. Once we get control of the blocker, we have to escape the block and pursue the football. In the "steer" drill we use the stab and grab drill. (Diagram #5) The players start in a form-fit position. They need to lock-out the arm to the side of the reach block. He has to keep his shoulders square to line of scrimmage. He goes back to the first drill and uses the reach and gather technique to force the blocker up field.
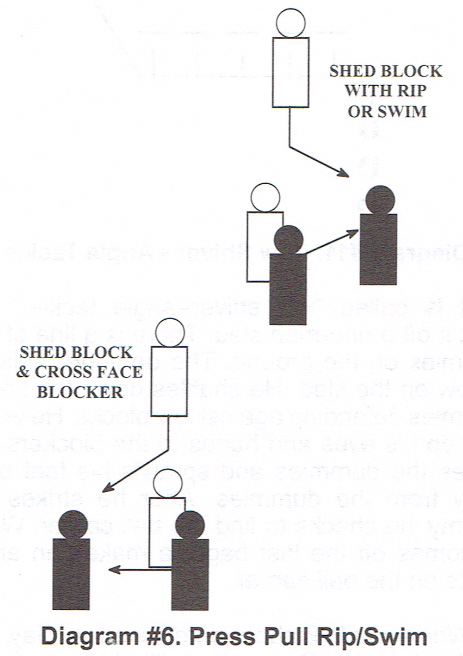
If you want to teach a player not to get reached, put him in a reached position and make him fight his way up field. He locks-out his outside arm and pushes up the field. He has to stay square as you fight up field and never turns his butt to the sideline. If you do that you give yourself a one-way-go. Stay square so you can escape inside as well as outside. To keep working up field you must recoil the hips. BLOCK RELEASE • Teach escaping blocks shedding • Coaching Point: gain control over blocker before escaping • Teach proper position to make play or enable ability to change direction • Incorporates • Stab & Grab ° Steering When we work block releases, we must gain control of the blocker before we can release. (Diagram #6) To release to the outside of a blocker it is simple. We want to be lower than the offensive blocker. We use the stab and grab on the blocker and get him under control. We press the blocker's shoulders up. With the outside hand, we are going to pull the outside shoulder down. As we pull we are going to rip or swim with the inside arm.
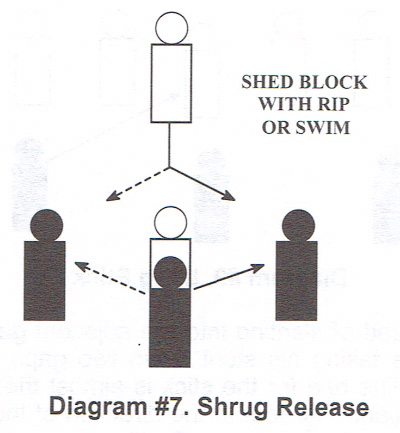
When players release off a block, I want them working down the line of scrimmage. If the running does not cross the line of scrimmage, he cannot gain any yardage. When we do the drill, we fit the offensive blocker and defender into a perfect fit. We have a ball carrier behind the offensive blocker. When we start the drill, the defender locks out on the blocker. The ball carrier is running the right down the crotch of the offensive blocker. He is going to make a break inside or outside. If the ball carrier breaks outside, the defender presses, pulls. rips/swims, and makes the tackle. If the ball carrier cuts inside the blocker, the defender has to cross face the blocker and make the tackle on the inside. The running back is not trying to fool the defender. He cuts one way or the other. He does not fake one way and go the other. I do not want the defender running up the field. I want them moving down the line. Press = Pull Rip/Swim • Form fit position • Lock out play side arm • Operate steer technique • Release using Rip or Swim • Come off block shuffle horizontally - do not run up field We also use a "Shrug" release to get off the block. (Diagram #7) In the shrug release, the defender starts in a head-up position on the offensive blocker. He uses the stab and grab technique and gains control of the blocker. The running back is behind the blocker. The running back cuts one way or the other and the defender shrugs the blocker away and makes the tackle. He has a two-way-go on the blocker.
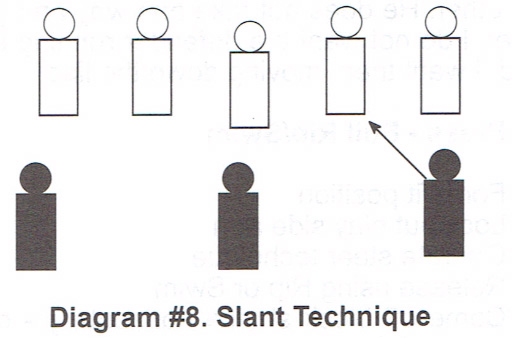
Shrug • Head up - two way go • Form fit position • Lock out man gaining block control • Aggressively throw man away from direction moving to When we teach the slant technique we want the foot in the direction we are moving back in the stance. (Diagram #8) That keeps the slanting linemen from having to do a crossover step as he goes inside. We want to take a short 45-degree step into the line of scrimmage. The key for the slanting lineman is the hip of the adjacent linemen. We want to leverage the block of the blocker if he steps at the slanting defender. If he goes away from the slanting defender, we want to flatten down the line of scrimmage, squeeze, and pursue.
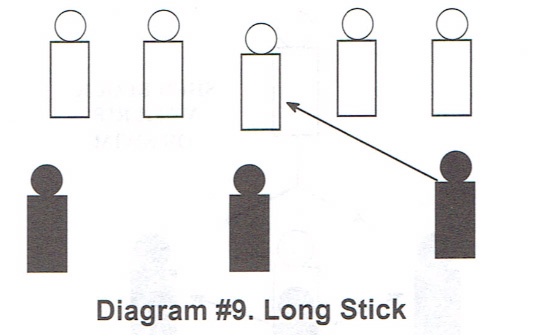
When the player slants he does not want to over-stride as he comes inside. He wants to keep the footwork within the frame work of the body. Some people key the ear hole on the head gear. If you teach the ear hole as your slant target, it will move. If I use anything on the head gear, I pick the smallest thing possible. That keeps the focus of the defender. When we teach the slant we also teach the "long stick." (Diagram #9)
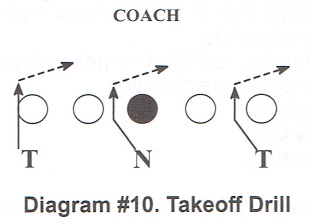
Instead of slanting into the adjacent gap, the tackle is taking his stunt down two gaps to the A-gap. The rule for the stick is almost the same as the slant. The foot in the direction of the stick will be back in the stance. On the snap of the ball the tackle wants to attack the line of scrimmage aiming for the near hip of the center. We key the block of the center as we go. If the block is coming toward the tackle, he leverages the block and plays in that gap. If the block goes away from him, he rips up through the A-gap. After we work the slant drills, we can work a takeoff drill and practice slanting as a group. (Diagram #10) We can practice a defensive call review or use it as an installation tool. We make the defensive call and run the call on the movement of the ball. It is a full speed rapid fire drill. We want to get as many reps in as possible in the time allotted. We can run stunts, line games, and blitzes in this drill. The objective of the drill is to gain knowledge of the schemes.
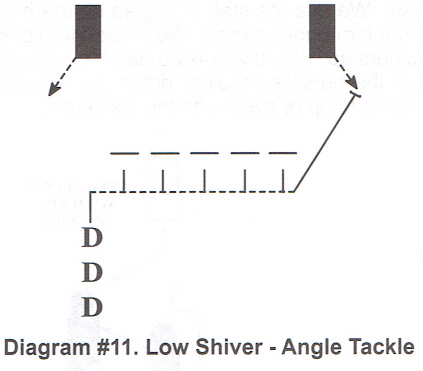
The last thing I want to share with you is a tackling drill we do. (Diagram #11)
It is called "low shiver-angle tackle." We work it off a one-man sled. There is a line of five dummies on the ground. The defender delivers a blow on the sled. He shuffles down the line of dummies defending against low blocks. He wants to keep his eyes and hands to the blockers. He strikes the dummies and sprawls his feet back away from the dummies. After he strikes the dummy, he checks to find the ball carrier. When he comes off the last bag, he makes an angle tackle on the ball carrier. When you talk about defensive line play, it is all about desire. Our motto is "It starts up front!" This is the one position on the field where you make contact on every single play. If you have a question, I will be around for the rest of the clinic. I appreciate your attention. Thank you very much. |
