| Developmental Drills for Offensive Linemen |
| By: Sam Keator - Gainesville High School (FL)
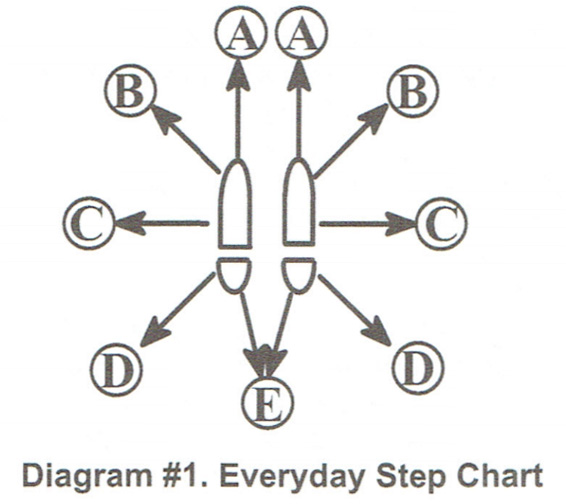
Originally Published in: Nike Coach of the Year Clinics - Earl Browning Provided by: Nike Coach of the Year I graduated from Gainesville High School in 1994. I had the pleasure to be able to play football at Sacramento State University in California. I got my bachelor's degree there. I am the offensive line coach and the Football performance coordinator and the ladies and men's weightlifting coach. I have my Bachelor of Science and Exercise Science degree and have been doing this for 17 years in junior college and in high school football. We have had some great success in doing things over the past years. I could sit up here and show you all of the steps in blocking and show a bunch of different blocking schemes. The thing is, you have to have players that already have the skills needed in order to perform those steps. You have to be able to do those things before you even come out onto the football field. Does everybody agree with that? If they do not have the body control and have never done it, they do not have the ability to do a one-step freeze. You have to get ahead of that as fast as you can. It is never too late to teach it and to learn it but you want to get a start on it just as fast as you can. By far the most important things I do are the postseason evaluation and athletic evaluation. This and in the athletic evaluation going into the offseason. It is just science on a piece of paper and a great way to set goals with your kids. The most important thing in football is getting into the correct stance. That starts with your feet and hips and then moves into your core shoulders and neck. Make sure you have trained the neck. It is a huge thing for an offensive lineman and football in general. My quarterback works his neck just as rigorously as the offensive line does. The next most important thing is getting out of your stance correctly. You need to have athletic twitch response, leverage force and balance. Balance all of the time. You have to be able to get the job done. That means you have to be physical enough to block. Deliver momentum (force), absorb momentum (force), re-create momentum (force), against an applying force. That is Newton's Law. Here is our basic philosophy of what we are going to do as a group. GAINESVILLE HIGH SCHOOL OFFENSIVE LINE We Will • Be the best STUDENT athlete we can be (Grade Checks) • Leave No Doubt...That we will be the hardest working position group in season, and off season! WE HAVE TO BE! • Have the best attendance as a position group. DEMANDED! School/Football • We will work to be the best we can be. • Camaraderie is the spirit of friendship and community in a group like the Camaraderie of soldiers at War who keep each other upbeat despite the difficulty of their circumstances. • Build togetherness • Build integrity • Be Smart • BE NASTY; WE WILL BE THE NASTIEST OFFENSIVE LINE IN THE DISTRICT! You are a student first and an athlete second. I do grade checks every two weeks. Take the time. If you are a head coach or coordinator, have your position coach check it. The thing is you cannot coach him if the kid is ineligible. All the kids want to go where after high school? College! They can't do that without grades. You start right off with grades. You are showing your players you care as well. I do it every two weeks because things can get bad after two weeks. That gives us time to fix things before they get totally out of control. If we identify something and come with a plan to fix it, if the kid didn't do his part he is suspended for a week. We have to be the hardest workers on the field. The hardest workers in season and during the off season. We will have the best attendance as a position group. That is demanded. It is not even an option. We will work to be the best athletes we can be. We are always trying to build camaraderie. Everything I do with my group is to build camaraderie. I don't coach running backs, I don't coach quarterbacks, I don't coach the defensive line. I will never tell my running backs coach how to coach running backs. I will educate them on what my group is going to do and then allow them to coach their group around that, if need be. Above is the definition of comradery. That is what came up when I put comradery into a google search. We are redoing our locker right now. That Definition of comradery is going up on our wall. Everything I do is to build a toughness. That includes our strength and conditioning program. It is a college strength and conditioning program. It makes scientific sense and it makes athletic sense and it is stupid simple. We do not have 4 hours twice a day to work our kids out. We have a class period of 50 minutes but you probably only get 30 minutes of lift time. After school, I got you. You are mine. You signed that goal evaluation sheet earlier so now I got you. You better be on time at 3:00 or at 3:01 the door is locked. Be where we're supposed to be. Be smart. We will to be smart. I am not just talking about classroom smart. We will be nasty. This is my brand. I teach nasty offensive line play. I teach it, I love it, it is what I did, and I don't know anything else but that. That is our goal. We want to be known as the nastiest offensive line in the district. We do play legal. We are not intentionally trying to hurt anybody but we are intentionally trying to impose our will on another man. I do teach holding. I was told in college that my job was to block. You can't worry about anything else but you better block. It doesn't matter how you do it, you better get it done. Let's talk about stance. You have to stay consistent. Go with what you know. Use the basics. Start with the heels on the ground. Start with the stretch. The down hand is on the ground with 10-15% pressure of body weight. It is a light hand. The free hand should be in an attack position just like a boxer. The knee should be inside the arch of the foot. Hips are bent. The off hand should be in tight and ready to respond. Eyes up through the eyebrows and be able to see the second level. Let me say something about the performance chart. I don't do this every month. I do it the first week we come back from school in January. I sit down with the players and I do measurements for the entire workout day. I have a couple of trainers and other coaches in there and we use a tailor's tape and we measure everything. Wrist, forearm, elbows, arms, shoulders, chest, neck, you measure it all. The reason why is for performance. We want to see a kid get better. We have a way to measure that. There's a stigma on how much people bench. They think it's all about that. Everybody is not a 450-bench press type of guy. We work everything off percentages and not everyone is the same. This is one of the best investments you will make in your athletes. Also do it the first week of Spring football and again before the July 4th break. Then we will do it during our helmet handout and acclimation period in the fall. I will not do it again until after the season. We lift throughout the season. We even lift on game day. Let's start from the bottom and work our way up. The first thing is ankle Mobility. Next, your knee is for stability. If your ankles and your hips are not right, then the knees are not going to be stable. If your knees, ankles, and hip are not right, then your lumbar spine is not going to be stable. Your thoracic spine for mobility is not going to be there. Your cervical spine for your neck is definitely not going to be stable. It is a chain. It is literally a chain. Everything that I do is from Newtons Law Number 2. It is the acceleration law. Acceleration (Force-Momentum) is produced when a force acts on a mass. The greater the mass of the object being accelerated; The greater the amount of force needed to accelerate the object. F=M(A) More mass means more force is needed to accelerate. BIG MEN! This is why we train optimal and submaximal. We do not max out all of the time. During weight lifting season we max out once every week. We will typically get a 10-pound increase every week by using this type of program. Your kids have to recover. You have to control the volume of what your kids are lifting. You HAVE TO! Take the time to do it. I don't care if you only have a two or a sixteen-bench weight room, you as the strength coach, offensive line coach, or head coach, you have to control their volume. They need to perform every rep at whatever percent you tell them to do. Educate your kids on why you do what you do. After a while, if they truly buy into it, they will do it the correct way every time and they will make sure their buddy is doing it right too. Let me start with our ankle flexion test. It does not matter which position you coach, start with the ankle flexion test. We start by taking the width of the player's hand, on the floor, away from a wall, and place our toe at that point. From that position, the athlete will lean in and try to touch his knee to that wall while keeping his heel down and foot flat on the ground. If a player can do that then we would have the athlete in a kneeling position with his toe at an additional inch or two from his previous position. This is the second level. From the kneeling position, the athlete will push forward with his knee and try to touch his knee to the wall, again while keeping his foot flat. Good ankle flexion is touching the wall at a hands width. Elite ankle flexion is the knee touching the wall at a few inches further from that position. We are trying to improve performance. Every day we have assisted hamstring stretching. Every day we have assisted hip abduction and groin stretch. Ninety percent of 8th graders going into the 9th grade, especially if they weigh over 190, have Glute Amnesia Syndrome. That means they could have pronated knees. I know a lot of us have seen that, especially for guys who grow real tall real fast, and their knees turn to the inside. They do not have the ability to stand with good posture. They can, but you have to work on it. This affects their core strength. You have to cure that before you can get him to improve to an optimum level. We do this with a series of stretching exercises. During stretching, we hold things to a 15 count. Again, this makes them uncomfortable. Keep them uncomfortable. Stimulate the heck out of their central nervous system. We will have offensive line stretching during our pregame on the field. I do not care what it looks like from the crowd perspective or what other people think about it. What I do know is we do not have injuries up front. We had no shoulder injuries up front this year, by the grace of god and them training the right way. It is simple stuff. Our team warm up is dynamic. We do our stretching in addition to what we do as a team. My previous three coaches only allowed me 7 minutes or less to get this done. That's okay. We can get it done. This is to really flex and then we go into our steps. You can overstretch though by wearing out your muscles. We make sure that doesn't happen. These stretches are uncomfortable. It hurts, especially in the beginning, but it gets better. We also foam roll them and we ice them down. During the summer, I went out to the local hardware store and got them to donate 20 of the big plastic trash cans. Why plastic trash cans? Unless you have a high school with about eight ice tubs, use trash cans. Have a tub, but use trash cans. It requires less ice. They are more easily moved than one of those big ice tubs when it is full. It is a much easier process to move or disinfect them than the bigger ice tubs. These trash cans will go right up to their hip. The three most important triple extension joints are cooling down, the ankles, knees, and hips. They are the ones that have been firing the most. All positions will hit the ice tubs for eight minutes. We then let the body warm back up naturally. This really helps with recovery time. Grip. If you are not training the grip with your athletes you need to start, especially your offensive linemen. As I said earlier, I teach holding. I love it. I think it is a great tool. 1 will take a flag. I am thin skinned and raised Irish Catholic. I have been yelled at by the best of them. My dad is not one to be messed with, so I can take all of the criticism you can give me, but we are going to work grip. It can be done a ton of different ways. The best way to do it is to go to the hardware store and get the rubber pipe covering they use for external pipes or air conditioning. Wrap it a few times with athletic tape and you have created a big bar for less than $10 rather than going out and spending several hundred dollars on a big bar. You can do towel pull ups. That is one of the hardest things that god has ever created, but it is amazing for grip strength. We do inverted rows from underneath using towels about 50% of the time. After we do grips, we start out practice with our Hand Punch Drill. Hand Punch Drill • Breastplate straight on • Breastplate right, shoulder right • Breastplate left, shoulder left • Single arm punch breastplate (both sides) I will have them pair up across from each other really quick and work the hand punch drill. We do not get into any crazy stance or anything. I just want them to fire their hand to where they are supposed to be. I am looking to see you grab him at the breastplate. If you are doing it the right way their chest will get bruised up. There is no wiggle room, they have got to grab it. When we go breastplate right, shoulder right, it will be a punch/grab/turn. Everything has to be punch/ grab/turn. I do not want to see punch/flat hand/ lift underneath the shoulder pad. I want to see punching the plate and grabbing the shoulder. I do not want to be called for holding, but we will hold. We will go three one way and then three reps the other way. They will go at their own pace but I will walk down the line observing them. On the single arm, we are aligned at a half man. I will punch and grab his breastplate with one hand. Make sure he is moving the outside foot. We are going both sides. Neuromuscular function. Train the brain. Everything is about neuromuscular function. The brain training and telling the muscles how to move. Next, we will go into our everyday step chart. (Diagram #1)
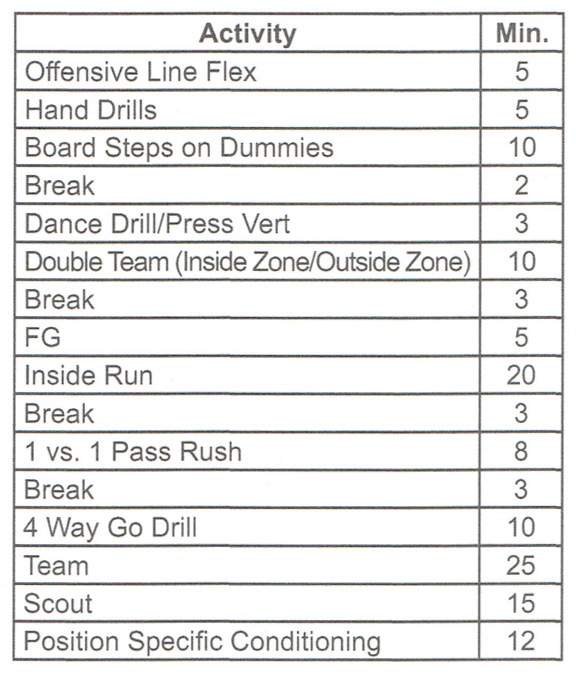
It is a basic step chart. There is no critical science to it. Everybody does it and we work on it going both ways from a right-handed stance and we work on it going both ways from a left-handed stance. Previous to this year we would switch our line over depending on the formation. As an offensive line coach, I absolutely hated it. I hated it because it made us look like we were walking around. I am going to impose my will on another man. When I am going up to the line of scrimmage I want to come with an attitude. I don't want to be trying to figure out if I am on the right side of the line or not. I want to come to the line of scrimmage and scan the defense right off the bat. This year we are staying on our sides. We do want kids to have the ability to play either side. I train them on both sides and it only takes an extra three minutes. Not only are you training the brain but you are making them more athletic. They have to think so you are also keeping them engaged. From here we will go into our Fitted Drills. First is Drive and Climb the man. I heard this from Coach Doug Marrone last week. Everybody has heard the phrase, heel replaces toe. I know everybody has heard this. What Coach Marrone said to describe offensive line play is, "We want kids playing in mud puddles." How do kids react when they play in mud puddles? They stomp their feet. Am I right? It is the same concept. It is funny when you tell them that because it just hits them. I want their feet at 1 o'clock. For the fit drill, we are going to start in a two-hand stance as low as you can uncomfortably go, with one foot up. Our arms are in tight. On the start, we are going to fire the hips and play in a puddle with our feet as we climb up the man. I do not want to see us raise up and then make contact where we are already up. It is a gradual climb. The defender will take a hand shield and turn it sideways. I want them to place their face into the bag and their hands come up under the bag. This is teaching them to keep their hands tight. We want to create torque. Everything is about torque. The next group of drills are unfitted. The first is the Rip and Reach. This is for the tackle that has a lose 7-technique and they are stunting on us. We have to take a bucket step and rip and reach. The rip and reach stays that way. The defender is pushing to stay in that gap at 75% speed. I want my offensive lineman to rip and reach and to be pushing back inside. Any good defensive lineman is going to be fighting to stay in their assigned gap. The Skip Pull drill is next. Everybody does it differently. Do it as your offensive coordinator wants you to do it. I do a skip pull if it is a one gap pull. If it is more than one gap, we pull into the line. It is always easier to work from the inside out. Skip pull and then find the linebackers. Do not lock on once you have found the linebackers, start heading toward your assignment. Our Combo drills are next. This is where we do our double-team drills. I break them up into groups of four. This is just practice and we are going at a walk-through pace because I want them to determine the post man and the drive man, and have the ability to see when they should come off on the linebacker. I want them to first, break it down and see the principles of what we are talking about. We are a bucket and cover double team on our inside zone and outside zone. What that means is one man is taking a bucket step behind the man, with his hand on the other man's hip. What this does is make it near impossible to split. We think this is the most effective way to do it. This is how I would start out a new player into our system. I call this the install. Install • Ankle/Hip Flexion • Stance ° Foot Alignment ° Weight Placement • Hand to 10-15% on down hand • Free arm is loaded outside the knee, loaded to jab like a boxer • Steps ° Entire Step Chart ° Heel/Toe Replacement or Run in Puddles ° Toes at 1:00 • Level & Punch ° Low pad level ° 3-point punch (Face and Hands) ° Grip I start with ankle and hip flexions in weight room testing. We will do duck walks. Duck walks are huge in offensive line performance. I want the duck walk down, past parallel, unless he has tested that he cannot get there. I want to see the whole foot into the ground. I want all of the cleats, or roots, into the ground for the tree. Get as many roots in the ground for the tree. That is why the ankle flexion is so big for me in the stance. That is the warm up drill. We are going to do anything to help with ankle and hip flexions. The stance comes next. With that comes foot alignment and weight placement. Starting with the centers. I am going to spread some more knowledge I got from Coach Marrone. I asked him how I could get a high school center to down block a 3-technique? That is the hardest block at any level. Every one of my athletes hates that. He said to have your center preset his feet at 12:30 to 1:00 instead of having them straight ahead at 12:00. He may want to decrease the width of his stance slightly when doing this. Having the feet straight ahead puts the knees directly over the toes. By moving them out just a little, the weight placement is now on the inside of the feet and legs. This puts you into a loaded position. The feet can't get out too far or he will be flat footed and not able to move out of his stance. I tested it out all of last week and I believe in it and we are doing it. It gives you the ability to take a bucket step and get flat down the line. I wish I would have figured that out when I was in college. The stance stays the same whether we are under center or in the shotgun. We wrist snap, never arm snap. It keeps our hands out front where they need to be and we will never wrist snap the ball over the quarterback's head. If we fumble the snap it will be right there in front of the quarterback. I teach our center to frame the ball. What that means is after he comes out of the huddle and scans the personnel, he will take a correct stance and then frame the ball. If we are running a play where he has to rip and run to the outside on a stretch play, I will have him frame the ball about four inches to the play side. Why? Because he is a high school athlete and he is really going to try to fly out of there so he can get to the edge. Just in case he gets a little long on his snap, because we have framed it, it will still be within the frame of the quarterback. We frame it to the side he is going to. As he steps, the ball is going right through the center of his crotch. This is something you have to start teaching the centers now. Train the brain, it works. If you have a problem with your center's snaps to one side and not the other, you may want to try framing the ball. From there we go to our steps. Everybody goes through our step chart. Heel toe replace or running in puddles, however you want to teach it. Toes at 1 o'clock as they are pounding the ground. They have to be in a football position and they have to be in balance. In Levels and Punch, we are looking at keeping a low pad level. That leads into our sled work. We also go over the 3-point punch. What that is, is your face and your two hands. Put your face in there. There are not a lot of pretty offensive linemen with modeling contracts. If I see a bunch of marks on the top of your helmet, you are not playing Coach Keator's brand of football. It is not uncommon for my guys to go through two facemasks during a season. I just work on it that way. I train the neck so they can handle it that way. If we are on the goal line, everybody on the offensive line is thinking 3-point punch. As soon as those hands set, my grip locks. Defensive linemen want space. As an offensive lineman, I want the defensive man in on me. I am literally going to grab you and pull you in on me as I am driving and climbing and running my hips through. Here is a typical practice day for me.
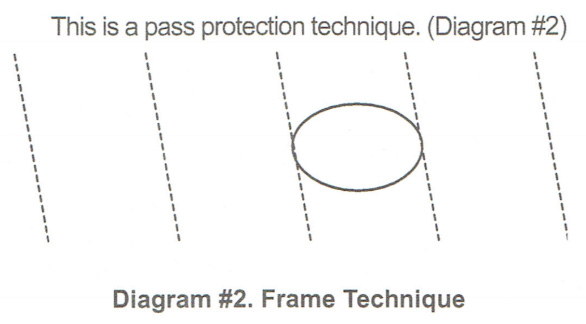
The first part is not very stimulating as far as getting their lather up. I have their breaks on a timer because we are training for optimal performance which is a quick turnaround. Perform, rest for a quick moment, and then turn around and go hard again. If you are having trouble reaching the guy on the end with your stretch or your jet plays, work on it with a dance drill. It is a great drill and I suggest you use it. It works for any speed. We line up head to head and I am trying to reach block you to the right and you are trying to reach block me to your left. Both at the same time. It is a full-on fight. We do it on a line so I can see that once I get there, I have to push vertical. It is not just to get into the guy's chest. You end up dancing and running all the way out to the sideline. We start in a 2-point stance and everybody goes to both sides, then we turn around and go from a 3-point stance. We go both left and right. It is a great drill for centers, guards, tackles, tight ends, everybody. This is a pass protection technique. (Diagram #2)
The frame of the body is from shoulder to shoulder. That is what I call my zero frame. Take that width and place it one frame over to the left and to the right. If the defender is playing even a little wider, say in a lose 7-technique, that would be two frames. A wide 9-technique would be three frames. I do not believe in the straight kickback pass set anymore. Why? Because if I straight kickback, I give him the inside go. If the defender is within my zero frame, I have a power step into the ground and I am in a power position. If the defender is one frame out from me, I am going to take one 45 degree kick step to that side and get my hands on him right now. If the defender is two frames out, I will take two 45-degree kick steps in my set to that side. Try this. I think you will find that it works. Thanks. |
